Integration Guide Yaskawa LS 1.5
This is the integration guide for Yaskawa robots with Locator Studio (LS) version 1.5 (Robot module version 1.5.0).
Prerequisites
Robot controller DX200, YRC1000 or YRC1000micro. For DX100 and FS100, contact the Help Center. NX100 and YRC Next (YNX) are not supported.
System software YBS 1.34 or newer (the most recent version is best).
MotoPlus option enabled.
Robot module files from the
yaskawa/LSpackage:MotoPlus Binaries/<controller>/PhotoneoModule_LS_1.5.0.out,INFORM/<controller>/*.JBIandINFORM/<controller>/VARNAME.DAT.
See also Robot communication overview and Robot module support matrix.
1. Robot Controller Setup
1.1 IP Configuration
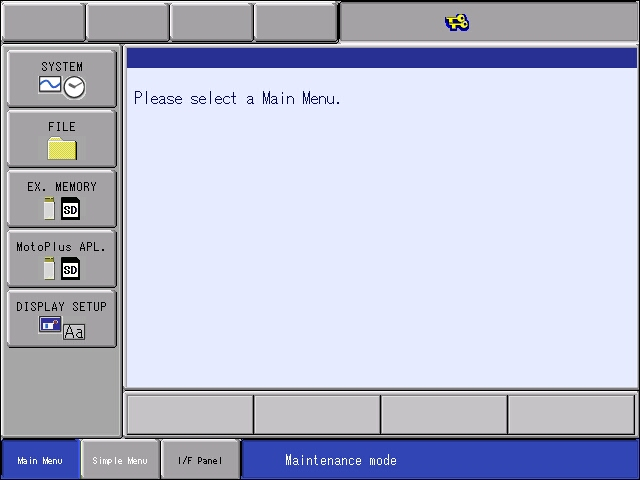
Start the robot controller in Maintenance Mode. To do this, hold the Main Menu button while you turn on the main switch. You hear a short beep during the boot. The figure below shows the Maintenance Mode screen:
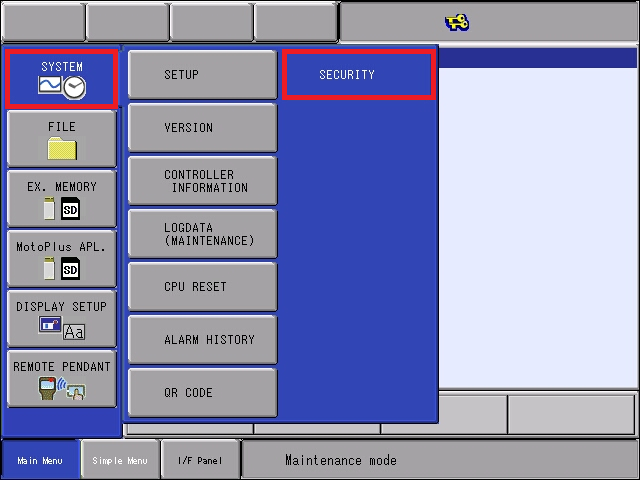
Change the security level from Editing to Management Mode. Go to System → Security.
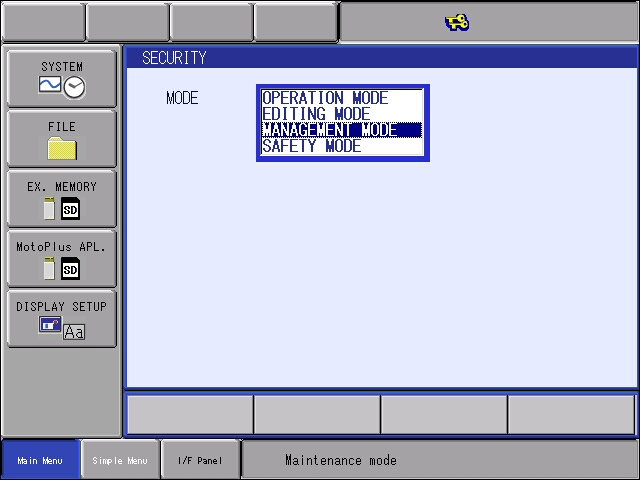
Select Management Mode from the list:
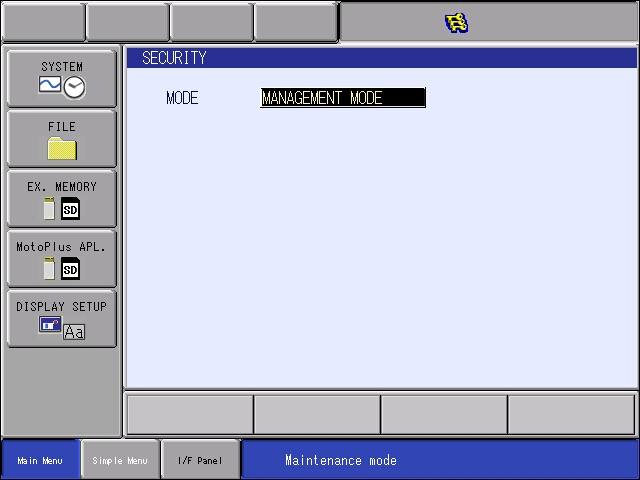
The password for Management Mode is 9999 9999 9999 9999 (16 x 9, without spaces):
Note
The three keys in the top status bar show that Management Mode is active.
To configure the IP address of the robot controller, go to System → Setup → Option Functions.
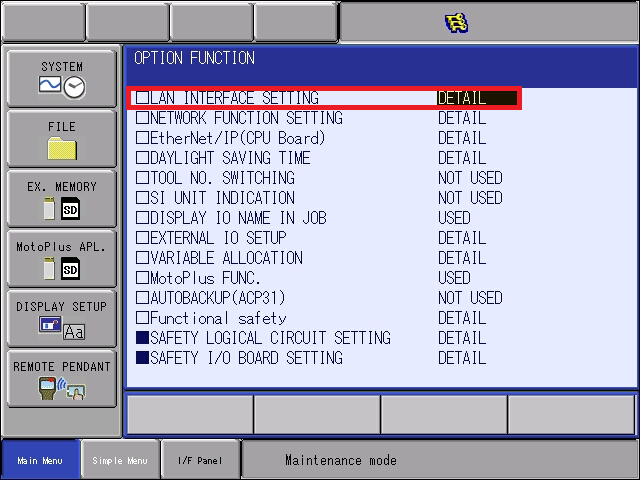
Select LAN Interface Setting to open the network configuration pane:
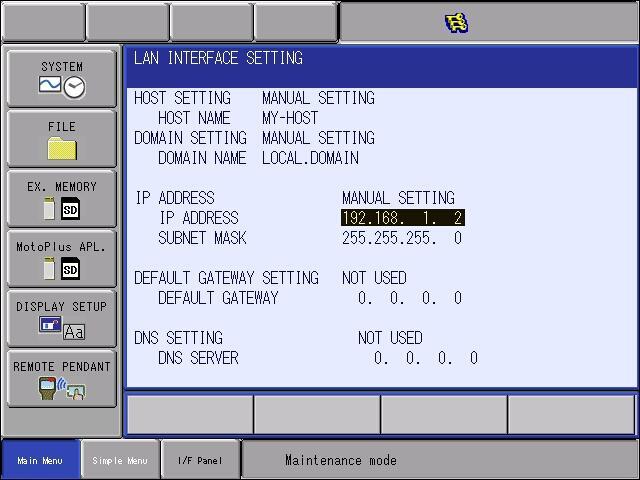
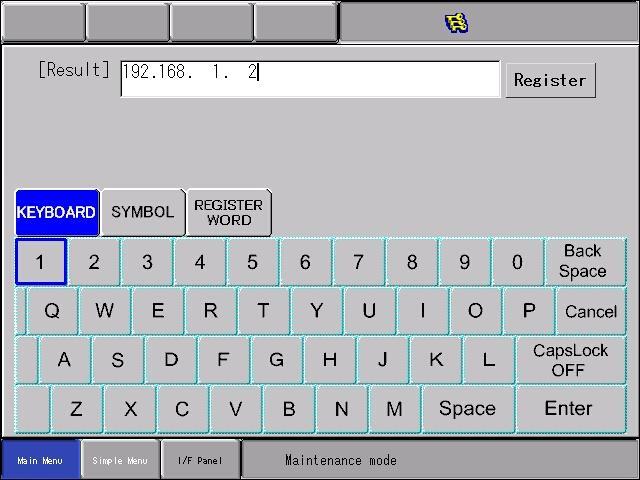
Select Manual Setting for the LAN2 port and change the IP address to match your network:
Note
We recommend that you connect the Ethernet cable to the LAN2 port.
Note
The subnet mask 255.255.255.0 is the same as a 24-bit subnet mask. See this table for more combinations: https://dnsmadeeasy.com/support/subnet
Example of a matching network configuration on the vision controller side:
Vision controller IPv4 address: 192.168.1.1 / 24
Robot controller IPv4 address: 192.168.1.2 / 24 (as configured in the previous step)
1.2 Enabling MotoPlus Functionality
If MotoPlus is not enabled on the robot controller yet, go to System → Setup → Option Functions.
Change the MOTOPLUS Func state from NOT USED to USED.
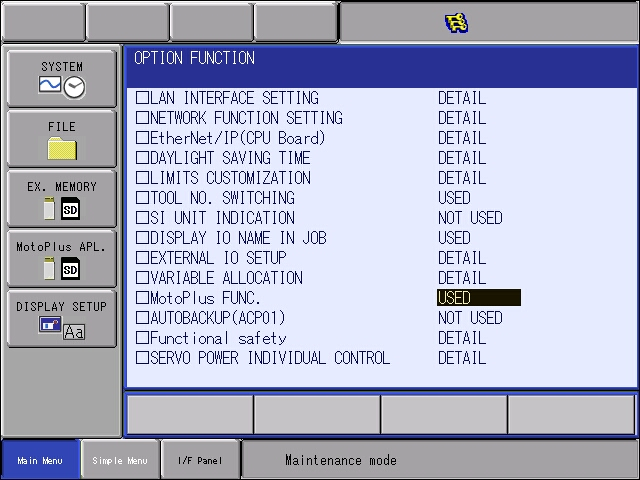
The MotoPlus APL icon is now visible in the left pane.
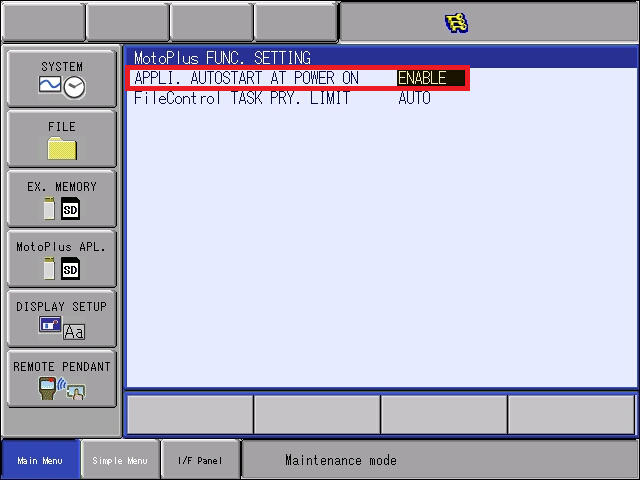
Open the MotoPlus Func. Settings:
Enable the MotoPlus autostart option:
1.3 Loading the MotoPlus Binary (.out)
The Photoneo Yaskawa interface consists of:
MotoPlus binary - PhotoneoModule_LS_1.5.0.out
INFORM files - request INFORM jobs + INFORM job templates + VARNAME.DAT
Use the .out file from the folder in MotoPlus Binaries (DX200, YRC1000, YRC1000u) that matches your robot controller type. Use the INFORM files from the folder with the same name in INFORM. Copy the file to the root directory of a USB flash drive.
To load the MotoPlus binary, do these steps:
Select MOTOPLUS Apl. → Load (User Application).
Select the PhotoneoModule_LS_1.5.0.out file and confirm Load. The Maintenance Mode part of the configuration is now complete.
Note
You can load only one Photoneo .out binary at a time. Check the File List to make sure that no other Photoneo MotoPlus binary is loaded. Then restart the robot controller in Normal Mode.
1.4 Loading the INFORM Jobs
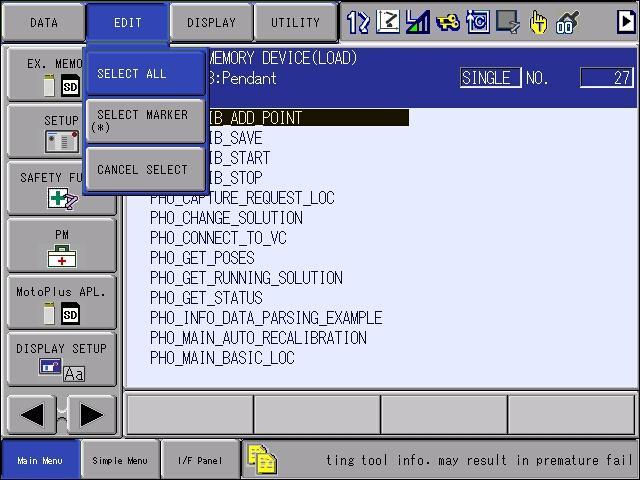
Copy all INFORM jobs to the root directory of the USB flash drive. Go to Ex. Memory → Load and use Edit → Select all to select all jobs from the INFORM folder:
Press Enter to start the transfer:
All job files are now available in the robot controller.
1.5 Loading VARNAME.dat
The VARNAME.dat system file comes with the INFORM jobs. It contains the names of the variables that the Robot module uses. When you load this file, it erases all existing variable names and adds the Photoneo names.
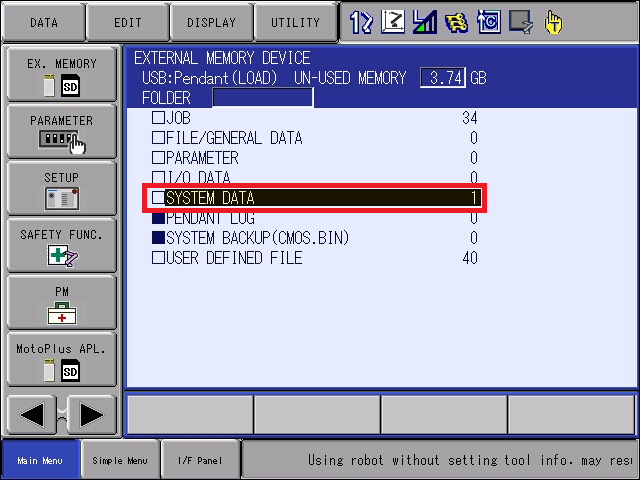
Copy VARNAME.dat to the root directory of the USB drive. Go to Ex. Memory → Load.
Select System Data.
Select the VARIABLE NAME → VARNAME.DAT file from the list, press Enter and confirm the load.
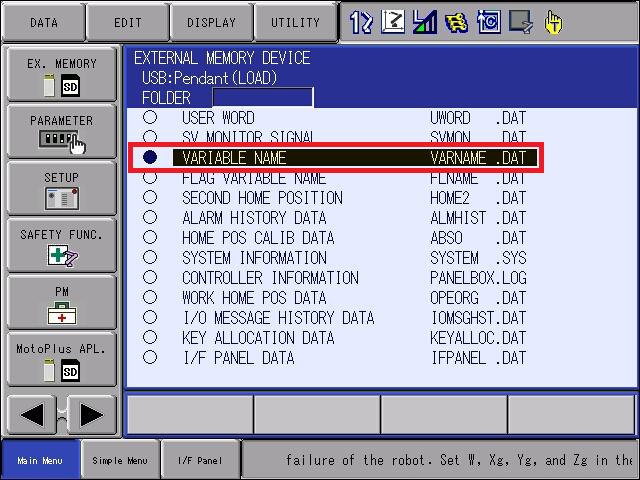
After this operation, all variable comments are erased and the Photoneo variable names are added (BYTE, INTEGER, POSITION). The LS 1.5 module does not use string variables.
1.6 Setting the Vision Controller IP Address on the Robot Side
Next, tell the Yaskawa robot controller the IP address of the vision controller, as configured on the LS Network page. The first 4 integer variables are used for this:
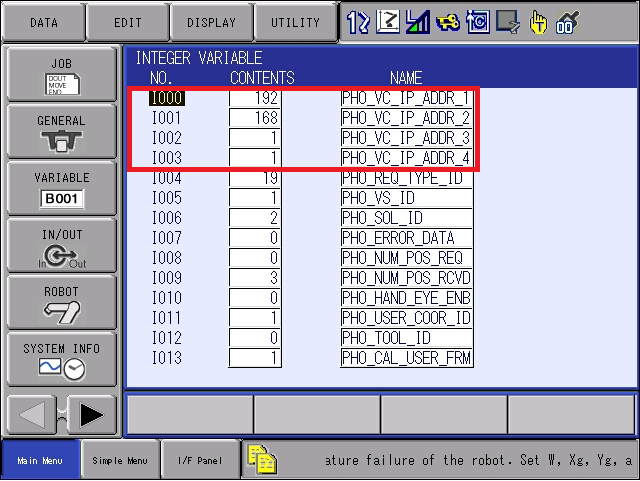
The IP address in the first 4 integer variables must match the vision controller IP address on the LS Network page:
To check that the robot controller is physically connected to the vision controller and that the network is configured correctly, use the Ping function in System Info → Network Utility:
Type the IP address of the vision controller in the Host field and press the Execute button:
If the connection works, Ping returns an “OK” message for all 4 attempts. You can also use the Test Connection button on the Network page of the vision controller to ping the Yaskawa robot from the vision controller.
The result of Test Connection (ping command) is Robot Available or Robot Unavailable.
If the robot is unavailable, check the cables and the network settings on both sides, and try again. Make sure that the Ethernet cables are connected to the correct ports. If you use a switch, make sure that it does not block the connection.
1.7 USER COORDINATE Setup
For LS solution types (Localization and Delayering), we recommend that you keep the original Yaskawa Base frame as the origin for both calibration and picking. The Yaskawa Base frame origin is at the intersection of the J1 axis and the J2 axis plane (see the image below). For successful calibration and picking, all values of User Coordinate 1 must be zero.
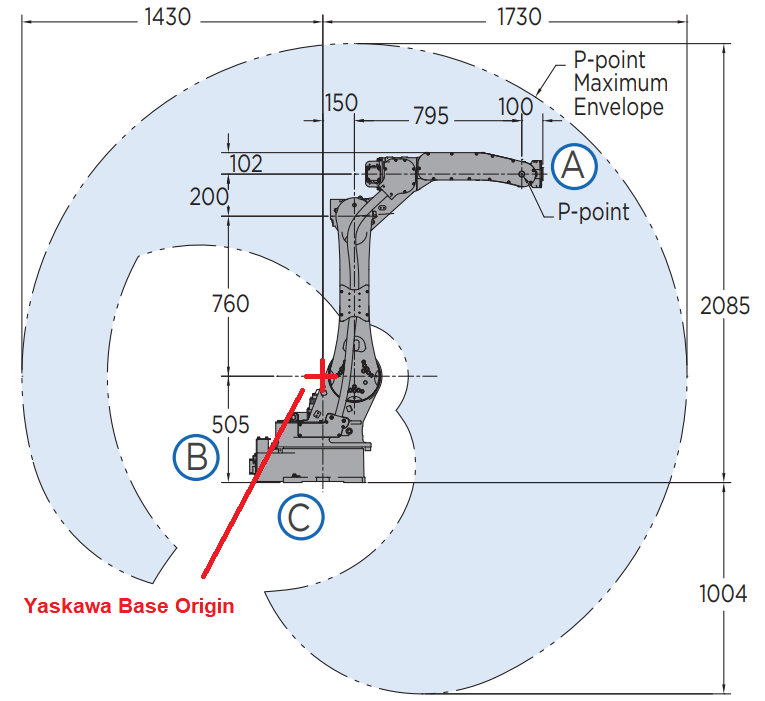
We recommend that you name this user coordinate frame PHO_ZERO_OFFSET. This prevents robot programmers from using the frame for other purposes later. To do this, follow the steps below:
To select the user frame, press Robot → User Coordinate.

Select User Coordinate 1 from the list and name it PHO_ZERO_OFFSET.
To see the coordinate values, select the first frame and press Display → Coordinate Data.
Make sure that all values are zero, Robot R1 is selected and the Basic Coordinate frame is set to BASE.
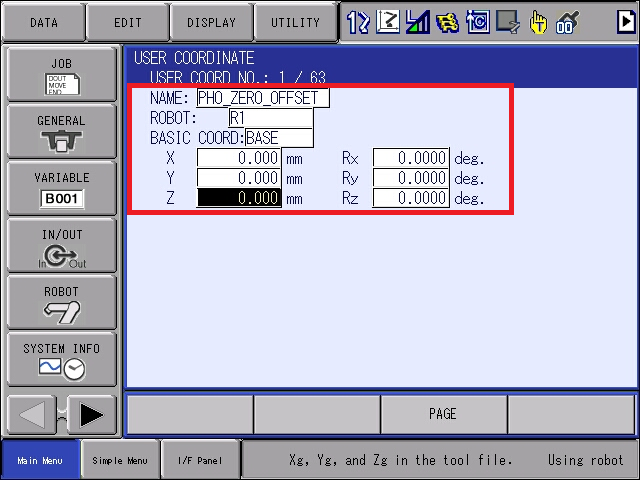
This configuration gives you a zeroed Yaskawa Base user coordinate frame. This is important for correct calibration and picking.
Note
Integer variable I013 PHO_CAL_USER_FRM is reserved in the variable list, but this version of the module does not use it. The TCP pose sent to the vision controller (calibration, hand-eye scan, capture) is always read in User Coordinate 1. If this causes problems in your application, contact the Help Center for a customized module version.
1.8 TOOL Frame
Note
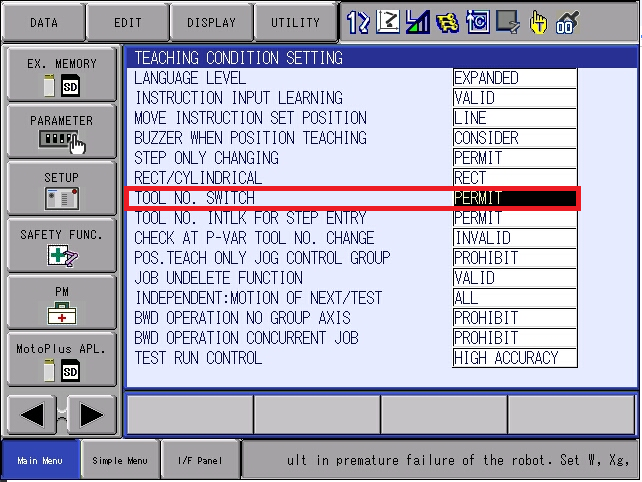
Tools are visible only if Setup → Teaching Conditions → Tool No Switch is set to Permit.
Calibration TOOL - for calibration, LS needs a zeroed tool frame. By default, TOOL 63 (the last one) is used. The module expects it to be all zeros. If TOOL 63 is zero, you do not need to change any coordinate values. We recommend that you give this tool a name, so that robot programmers do not use it later.
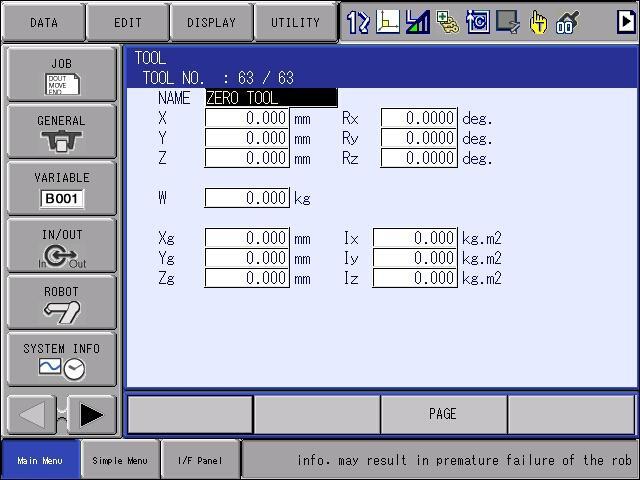
Picking TOOL - for picking, use a correctly configured and calibrated tool ID, as in any normal robot application.

Note
Integer variable I014 PHO_CAL_TOOL_FRM is reserved in the variable list, but this version of the module does not use it. The TCP pose sent to the vision controller is always read with Tool 63. If this causes problems in your application, contact the Help Center for a customized module version.
1.9 Robot State Server
The LS module has no Robot State Server. For calibration and hand-eye scans, the robot sends its pose together with the request. All communication runs over one connection from the robot to the vision controller on port 11003.
2. Robot Module
2.1 Request List
This section describes the requests that the Robot module supports. Use these procedures to control LS from an INFORM program. Every request job writes the request ID to I004 and sets B002. Then it waits for B003 (except PHO_SCAN_REQUEST_LOC). Action requests describes the meaning of each request.
INFORM job |
Function |
Request ID |
Input |
Populates |
|---|---|---|---|---|
PHO_CALIB_ADD_POINT |
Add calibration point request. Sends the current TCP pose (Tool 63, User Coordinate 1). |
5 |
None |
I007, I015 |
PHO_CHANGE_SOLUTION |
Change solution request |
9 |
I006 |
I007 |
PHO_START_SOLUTION |
Start solution request |
10 |
I006 |
I007 |
PHO_STOP_SOLUTION |
Stop solution request |
11 |
None |
I007 |
PHO_GET_RUNNING_SOLUTION |
Get running solution request |
12 |
None |
I007, I034 |
PHO_SCAN_REQUEST_LOC |
Regular scan request. If I010 = 1 (hand-eye), the current TCP pose is sent with the request. Does not wait for the response. |
19 |
I005, I010 |
None (use PHO_WAIT_FOR_SCAN) |
PHO_WAIT_FOR_SCAN |
Counterpart of the scan request (and of the last capture request in dynamic meshing) |
- |
None |
I007 |
PHO_GET_POSES |
Request the Cartesian poses of the localized objects |
20 |
I005, I008, I011, I012 |
I007, I009, P011-P100, I024-I029 |
PHO_GET_STATUS |
Get vision system status: number of localized objects, number of pickable objects, vision system status (running/finished) |
22 |
I005 |
I007, I016, I017, I018 |
PHO_CALIB_START |
Start calibration request |
25 |
I005, I006 |
I007 |
PHO_CALIB_STOP |
Stop calibration request |
26 |
None |
I007 |
PHO_CALIB_SAVE |
Save calibration request at the end of calibration |
27 |
I011, I012 |
I007, I015, P010 |
PHO_CAPTURE_REQUEST_LOC |
Capture scan request for meshing. It does not start localization. Sends the current TCP pose and waits for the response (B003). |
30 |
I005, B004, I031* |
I007, B005 |
PHO_REUSE_SCAN_REQUEST_LOC |
Reuse the last captured scan for localization on a different vision system |
31 |
I005 |
I007 |
PHO_CHANGE_BBOX |
Request to change the bounding box |
33 |
I005, I032 |
I007 |
PHO_COM_CHECK |
Request to check the communication |
100 |
None |
I007 |
I005 vision system ID, I006 solution ID, I007 error data, I008 number of requested poses, I009 number of received poses, I010 hand-eye on/off, I011 user coordinate ID and I012 tool ID stored with the received poses, I015 calibration accuracy (µm), I016 number of localized objects, I017 number of pickable objects, I018 vision system running/finished, I024-I029 Info data of the last received object, I031 *capture gap (used only in dynamic meshing), I032 bounding box ID, I034 running solution ID, B004 dynamic meshing on/off, P010 calibration result pose, P011-P100 Cartesian object poses (max 90)
2.2 INFORM Connection Procedures
This procedure connects the MotoPlus binary to the vision controller and disconnects it.
INFORM job |
Description |
|---|---|
PHO_CONNECT_TO_VC |
INFORM job that tells the MotoPlus binary to connect to the vision controller. It first sends a disconnect request (ID 201) to close any previous session. Then it sets B000 and waits for B001. |
2.3 INFORM Example List
The LS 1.5 module includes several INFORM example programs. They show how to use the requests from section 2.1 in different use cases:
INFORM example |
Description |
|---|---|
PHO_MAIN_CALIBRATION PHO_MAIN_CALIBRATION_HAND_EYE |
Template for the calibration procedure. The user must start and confirm the first calibration of a vision system manually on the vision controller side. The calibration procedure needs the USER COORDINATE configuration from chapter 1.7. Teach all 9 poses that calibration needs. If PHO_CONNECT_TO_VC connects to the vision controller, each PHO_CALIB_ADD_POINT request sends the current robot pose to the vision controller. If there is no connection, you can add the robot poses manually on the vision side. Type the values of the current robot pose from the teach pendant. As a rule of thumb, the calibration error must be below 3mm. If it is higher, there is usually a systematic error (for example, the robot does not report the correct pose, or the calibration ball moved between poses). If the calibration error is below 3mm, save the calibration on the vision controller side and quit calibration. |
PHO_MAIN_AUTO_RECALIBRATION |
After the first calibration is successful and automatic recalibration is allowed in the vision system settings, you can run automatic recalibration from the robot. You do not need to touch the vision system. The calibration object must stay where it was during the first calibration. The calibration ball stays mounted in the same place on the flange or gripper and moves with the robot. The marker pattern stays in the same place in the cell. Sequence: PHO_CONNECT_TO_VC, PHO_STOP_SOLUTION (calibration cannot start while a solution is running), set I006 / I005, PHO_CALIB_START, 9 x (MOVJ + PHO_CALIB_ADD_POINT), PHO_CALIB_SAVE, PHO_CALIB_STOP. After PHO_CALIB_SAVE, I015 holds the calibration accuracy (µm) and P010 holds the calibration pose. Check I007 after each request. |
PHO_MAIN_BASIC_LOC |
Very basic example for a statically mounted scanner. It shows how to initialize a system, send a scan request, send a get poses request, receive the targets and execute the paths. The example also shows error handling: PHO_WAIT_FOR_SCAN and PHO_GET_POSES return the error value in I007 - PHO_ERROR_DATA. Before you run this INFORM job, set the Start and End positions manually in PHO_PICK_OBJECTS_LOC (Chapter 3.1). |
PHO_MAIN_BASIC_LOC_HAND_EYE |
Same as PHO_MAIN_BASIC_LOC, but for a hand-eye mounted scanner. The only differences are that the scanning pose is different from the static mount and that the I010 - PHO_HAND_EYE_ENABLE switch is ON. |
PHO_MAIN_BASIC_LOC_MULTI_VS |
Same as PHO_MAIN_BASIC_LOC, but switches between two vision systems. Integer variable I005 PHO_VS_ID is important here. Its value controls which vision system is triggered or asked for poses. The first pick in the loop uses vision system 1 and the second pick uses vision system 2. |
PHO_MAIN_BASIC_LOC_SOL_SWITCH |
Same as PHO_MAIN_BASIC_LOC, but shows how to use all solution switching requests. Integer variable I006 PHO_SOL_ID is important here. It defines which solution the next PHO_START_SOLUTION or PHO_CHANGE_SOLUTION request activates. |
PHO_MAIN_BASIC_LOC_CHANGE_BBOX |
Same as PHO_MAIN_BASIC_LOC, but shows how to use the bounding box switching request. Together with I005 PHO_VS_ID, integer variable I032 PHO_BBOX_ID is important here. It defines which bounding box the next PHO_CHANGE_BBOX request activates. |
PHO_MAIN_BASIC_LOC_REUSE_SCAN |
Same as PHO_MAIN_BASIC_LOC_MULTI_VS, but uses PHO_REUSE_SCAN_REQUEST_LOC instead of regular scan requests. This request is useful when the scene has not changed since the last scan, but you want to repeat localization with a different configuration (different objects, different bounding boxes or different settings). The scan for VS1 is a regular scan, and the scan for VS2 reuses the scan from VS1. Integer variable I005 PHO_VS_ID selects the vision system for reused scans in the same way as for regular vision system switching. |
PHO_MAIN_LOC_MESHING_STATIC |
Example of how to stitch multiple scans before localization starts. This is useful for complex scenes or large objects. This example uses the static approach: the robot stops in each scanning position and triggers/captures a scan. B004 PHO_MESH_DYNAMIC must be set to 0. PHO_CAPTURE_REQUEST_LOC waits for its own response, so you do not need PHO_WAIT_FOR_SCAN after each capture. Check I007 instead. When capturing is complete, send a regular PHO_SCAN_REQUEST_LOC to start localization. This request does not trigger a real scan. It only starts the localization process. The total number of scans must be less than 10. |
PHO_MAIN_LOC_MESHING_DYNAMIC |
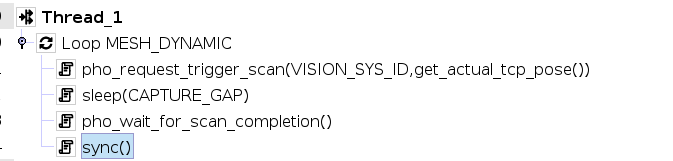
Similar to PHO_MAIN_LOC_MESHING_STATIC, but the capturing happens while the robot moves continuously. LS combines Photoneo Instant Meshing technology with the Parallel Structured Light technique of MotionCam-3D. Important flags and variables: B004 PHO_MESH_DYNAMIC, B005 PHO_MESH_STARTED, I031 PHO_CAPTURE_GAP. This example shows how to start a capturing procedure. MotionCam-3D triggers scans with the delay set in I031 PHO_CAPTURE_GAP while the robot moves through predefined waypoints. Set B004 - PHO_MESH_DYNAMIC to TRUE before PHO_CAPTURE_REQUEST_LOC to activate dynamic meshing mode. Set I031 PHO_CAPTURE_GAP to approximately 100-500 ms to limit the scan rate, so that the system does not get too many scans (values outside 0-10000 ms are replaced by 500 ms). The robot position during the first scan defines the orientation of the final point cloud. Because of this, the Photoneo interface blocks robot motion until the MotoPlus binary sets B005 - PHO_MESH_STARTED to 1 after it receives the first scan. The flag is reset after the last scan is captured. In the dynamic case, only the last PHO_CAPTURE_REQUEST_LOC is followed by a PHO_WAIT_FOR_SCAN request. At the end of capturing, send a regular PHO_SCAN_REQUEST_LOC to start localization. This scan does not flash any light. It only starts the localization process. The scanning trajectory must be smooth, without large rotations, and the scanned area must stay in the field of view all the time so that tracking is not lost. The total number of scans must be less than 60. |
2.4 INFORM Picking Procedures
This procedure picks and places all objects received from the vision controller. It is only an example of how to go through the received targets and control the robot movements. It loops I019 from 0 to I009 - 1, calculates the pose number I020 = 11 + I019 and moves to P[I020] with the approach / deapproach shifts P008 / P009. Touch up the local Start and End points in PHO_PICK_OBJECTS_LOC before you run the main program. You can copy and change this procedure if necessary.
INFORM job |
Description |
|---|---|
PHO_PICK_OBJECTS_LOC |
INFORM job that picks and places the targets received from the vision controller. |
2.5 BYTE Variables
This version of the LS module uses these 6 byte variables:
BYTE variable |
Description |
Set by |
|---|---|---|
B000 PHO_CONNECT_VC |
The INFORM job sets this flag to tell the MotoPlus binary to connect to the vision controller. |
user |
B001 PHO_CONNECTED |
The MotoPlus binary sets this flag after it connects to the Action Request Server in LS. It resets the flag when the session ends. |
system |
B002 PHO_NEW_REQ |
The request INFORM job sets this flag to tell the MotoPlus binary that the user started a new request. The MotoPlus binary resets this flag after it processes the request. |
user |
B003 PHO_REQ_FINISHED |
The MotoPlus binary sets this flag to tell INFORM that the response to the last request has arrived. The INFORM side resets this flag immediately. |
system |
B004 PHO_MESH_DYNAMIC |
This flag activates dynamic meshing mode. Set it to TRUE before the first PHO_CAPTURE_REQUEST_LOC request. Reset it to FALSE immediately after the robot reaches the last meshing waypoint to stop the scanning sequence. Set it to FALSE if you use capture in static mode. |
user |
B005 PHO_MESH_STARTED |
The MotoPlus binary sets this flag to tell INFORM that the first scan of the meshing sequence has arrived. INFORM can then start the predefined capture trajectory. |
system |
2.6 INTEGER Variables
This version of the LS module uses these integer variables:
Variable |
Description |
Set by |
|---|---|---|
I000 PHO_VC_IP_ADDR_1 |
First octet of the vision controller IP address |
user |
I001 PHO_VC_IP_ADDR_2 |
Second octet of the vision controller IP address |
user |
I002 PHO_VC_IP_ADDR_3 |
Third octet of the vision controller IP address |
user |
I003 PHO_VC_IP_ADDR_4 |
Fourth octet of the vision controller IP address |
user |
I004 PHO_REQ_TYPE_ID |
Every request INFORM job sets this to tell MotoPlus which request to process (request ID) |
system |
I005 PHO_VS_ID |
Vision system ID for the next request |
user |
I006 PHO_SOL_ID |
Solution ID for the next request |
user |
I007 PHO_ERROR_DATA |
Result of the request. See the error table for the error code descriptions |
system |
I008 PHO_NUM_POS_REQ |
Number of poses requested by PHO_GET_POSES (the module stores a maximum of 90) |
user |
I009 PHO_NUM_POS_RCVD |
Number of poses received by PHO_GET_POSES. The poses are in P011 to P011 + I009 - 1 |
system |
I010 PHO_HAND_EYE_ENB |
Switches between static mode (0) and hand-eye mode (1). In hand-eye mode, PHO_SCAN_REQUEST_LOC sends the current TCP pose (Tool 63, User Coordinate 1) with the request |
user |
I011 PHO_USER_COOR_ID |
User frame number stored with each received pose (P010-P100). The poses are written in robot base coordinates, which are the same as User Coordinate 1 (PHO_ZERO_OFFSET, chapter 1.7). The examples set 1. It does not change the TCP sent to the vision controller (always User Coordinate 1) |
user |
I012 PHO_TOOL_ID |
Tool number stored with each received pose (P010-P100). Set it to the picking tool that you move with (the examples set 0). It does not change the TCP sent to the vision controller (always Tool 63) |
user |
I013 PHO_CAL_USER_FRM |
Reserved, not used in this version (calibration always uses User Coordinate 1) |
user |
I014 PHO_CAL_TOOL_FRM |
Reserved, not used in this version (calibration always uses Tool 63) |
user |
I015 PHO_CALIB_ERROR |
Calibration accuracy in micrometers, filled by PHO_CALIB_ADD_POINT and PHO_CALIB_SAVE (Info data key 10) |
system |
I016 PHO_NUM_OF_LOC |
Number of localized objects. Filled by PHO_GET_STATUS (Info data key 12) |
system |
I017 PHO_NUM_PICKABLE |
Number of pickable objects. Filled by PHO_GET_STATUS (Info data key 13) |
system |
I018 PHO_CURR_VS_STAT |
Current vision system status: 1 = still running, 0 = finished. Filled by PHO_GET_STATUS (Info data key 14) |
system |
I019 PHO_RESERVED |
Loop counter used by PHO_PICK_OBJECTS_LOC |
system |
I020 PHO_RESERVED |
Pose number calculated by PHO_PICK_OBJECTS_LOC |
system |
I021 PHO_INFO_DATA_1 |
Reserved. Matches BPS PHO_TOOL_INV (not used in LS) |
system |
I022 PHO_INFO_DATA_2 |
Reserved. Matches BPS PHO_GRIPPING_PT_ID (not used in LS) |
system |
I023 PHO_INFO_DATA_3 |
Reserved. Matches BPS PHO_GRIPPING_PT_INV (not used in LS) |
system |
I024 PHO_INFO_DATA_4 |
X dimension of the object, mm (AI-based solutions, Info data key 4) |
system |
I025 PHO_INFO_DATA_5 |
Y dimension of the object, mm (AI-based solutions, Info data key 5) |
system |
I026 PHO_INFO_DATA_6 |
Z rotation of the object in whole degrees. The module converts the received milliradians (AI-based solutions, Info data key 6) |
system |
I027 PHO_INFO_DATA_7 |
Neural network label of the object (AI-based solutions, Info data key 7) |
system |
I028 PHO_INFO_DATA_8 |
Max Z height, mm (Info data key 8) |
system |
I029 PHO_INFO_DATA_9 |
Tilt, mrad (Info data key 9) |
system |
I030 PHO_INFO_DATA_10 |
Reserved. Not filled (Info data key 10 goes to I015) |
system |
I031 PHO_CAPTURE_GAP |
Delay in milliseconds between scans in Instant Meshing mode |
user |
I032 PHO_BBOX_ID |
Bounding box ID for the next request |
user |
I034 PHO_RUNNING_SOLUTION |
ID of the running solution (filled by PHO_GET_RUNNING_SOLUTION, Info data key 11) |
system |
2.7 POSITION Variables
P000 - P007 are free for customer use.
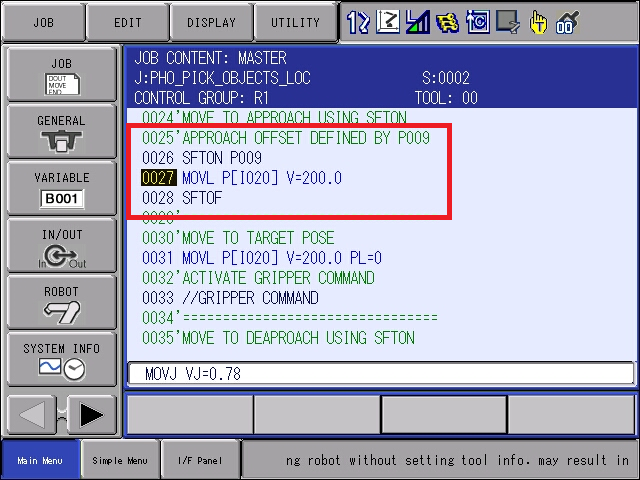
P008 and P009 are CART poses for the approach and deapproach offsets in the PHO_PICK_OBJECTS_LOC routine. Set only the Z value in these variables, so that the SFTON shift operation works correctly. For example, the approach pose shown below sets the approach point 100mm above the target pose when you use it within SFTON- SFTOF.

P010 is reserved for the save calibration request. It holds the calibration pose after automatic recalibration.
P011 - P100 are reserved for the Cartesian poses received from the vision controller (maximum 90 poses; I009 shows how many were received). The poses are Cartesian (robot base coordinates) and carry the user frame I011 and the tool I012.
This version of the LS module uses these position variables:
Variable |
Representation |
Description |
Set by |
|---|---|---|---|
P000 |
Free for customer use |
user |
|
… |
Free for customer use |
user |
|
P007 |
Free for customer use |
user |
|
P008 |
CART |
Approach pose for PHO_PICK_OBJECTS_LOC (you can change the code and use it) |
user |
P009 |
CART |
Deapproach pose for PHO_PICK_OBJECTS_LOC (you can change the code and use it) |
user |
P010 |
CART |
Calibration pose from automatic recalibration, returned by the PHO_CALIB_SAVE request. This pose is useful for checks or for reteaching points, especially in hand-eye applications. |
system |
P011 |
CART |
Cartesian result received from the vision controller |
system |
… |
CART |
Cartesian result received from the vision controller |
system |
P100 |
CART |
Cartesian result received from the vision controller |
system |
3. Runtime
When the solution is configured, all vision systems are calibrated and all previous steps are done, complete the final steps on the robot side. Then run the MAIN program on the robot.
3.1 Teaching Start and End Poses in PHO_PICK_OBJECTS_LOC
The Start and End poses in PHO_PICK_OBJECTS_LOC are the first and last waypoints of each pick. Touch them up before you run the main picking procedure.
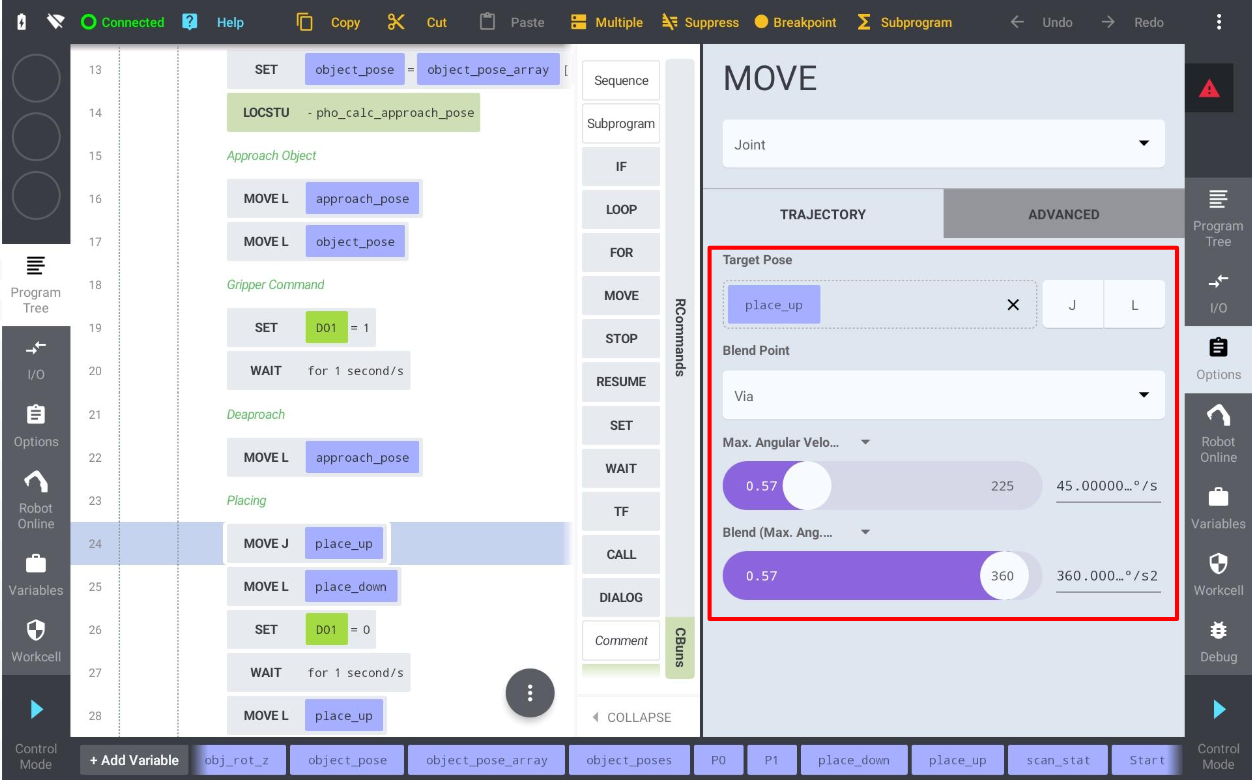
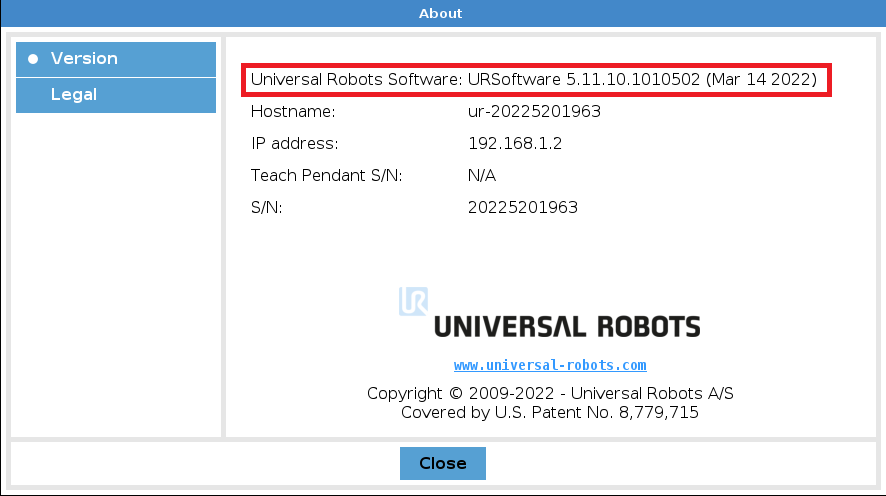
To touch up the point, move the program pointer to the MOVJ line and press Servo On Ready. Jog the robot to the Start position. Then press Modify and Enter to confirm the new pose value.
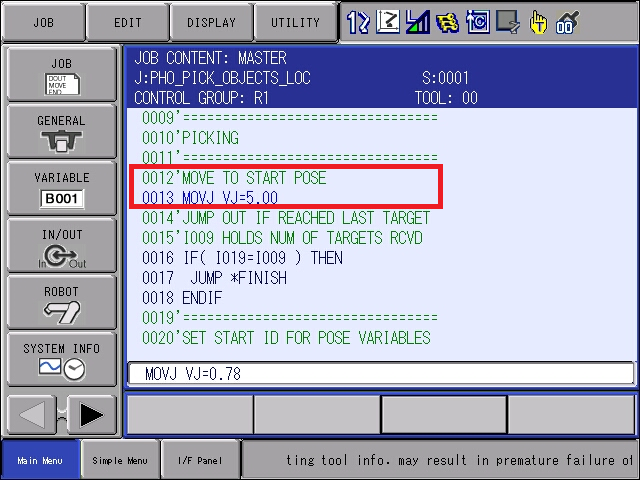
Repeat the same steps for the End pose.
3.2 Gripper Commands
An LS solution does not control the gripper. Use regular DOUT or other IO commands to control the gripper at the Grasp and Drop points.
3.3 Touching Up Local MOVJ Positions
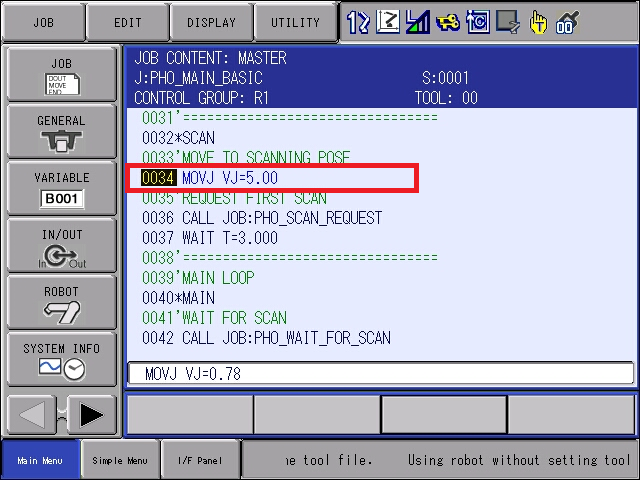
If you use the PHO_MAIN templates, scroll through the program and find the MOVJ commands. Make sure that the robot is in the correct position during scanning: outside the scanning volume for statically mounted sensors, or above the bin for hand-eye mounted sensors.
3.4 Runtime Prerequisites
Do a final check before you run the picking program from the robot side.
Make sure that:
The solution is configured correctly on the vision controller side.
The network setup on the robot side is complete and ping works in both directions.
All vision systems in the solution are calibrated.
The Start and End poses in PHO_PICK_OBJECTS_LOC are touched up.
All local poses in the MAIN job that you want to run are touched up correctly.
The gripper procedures are ready and work.
3.5 Running the Main INFORM Job
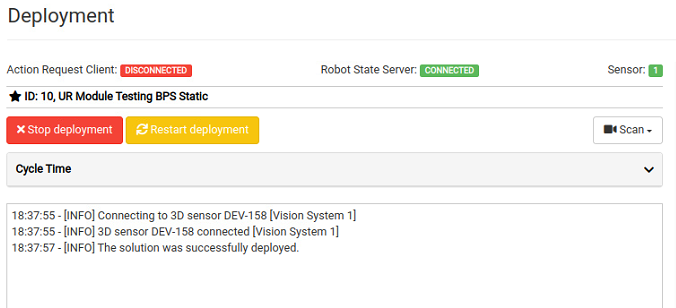
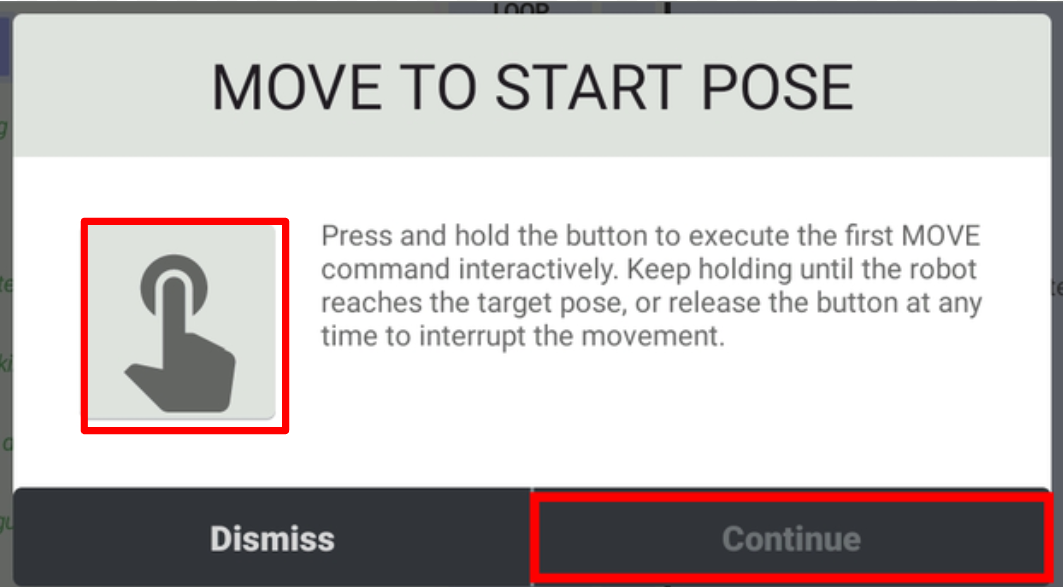
Deploy your solution. If the communication is not established yet, the Action Request Client (robot) status on the Deployment page is DISCONNECTED.
Note
We strongly recommend that you run the program with TEST START first, before you run it in Auto mode.
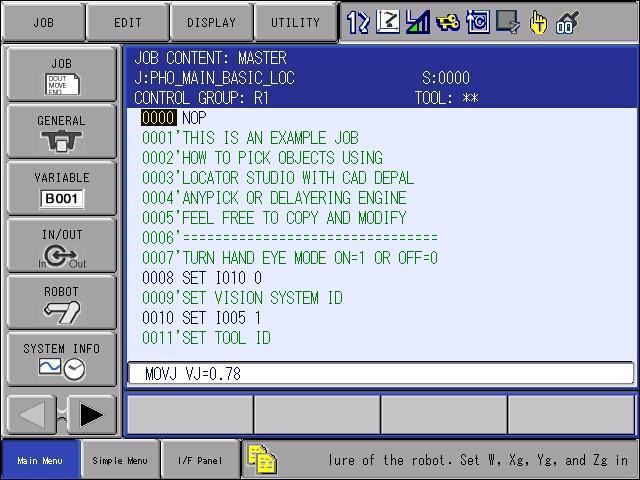
Use the Select button to go to the program that you want to run, in this case the PHO_MAIN_BASIC_LOC.JBI template:
Hold the Interlock and Test Start keys to test start the program. If the connection is established correctly, the Action Request Client status changes to CONNECTED. The sensor then captures the first scan and localization starts.
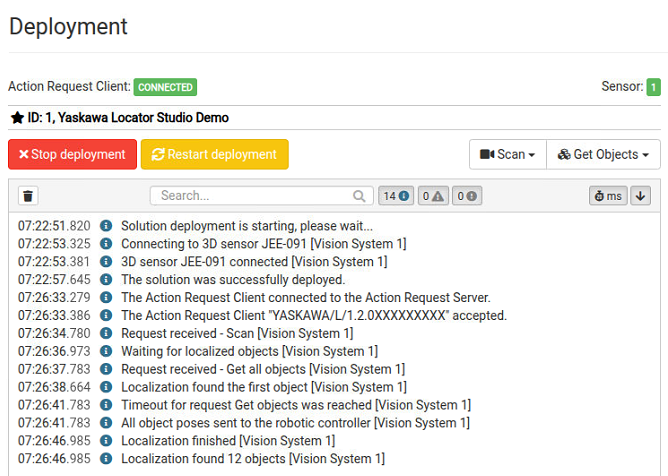
If there is a pickable object in the scene and the robot controller has received the poses, the robot starts to move towards the first object. You can check P011 and higher to see if these position variables contain Cartesian poses.
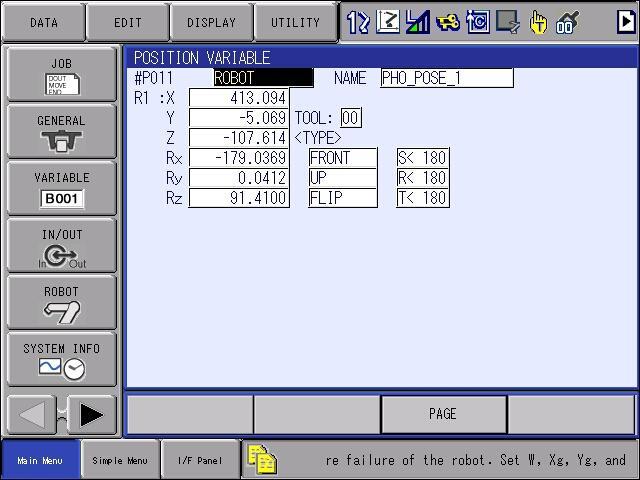
If everything looks correct, continue to move the robot towards the first target and check that the path is correct. If the robot stops too far from the object or pushes the object too deep, adjust the origin offset on the Picked object page, or change the TCP configuration on the robot side.
4. Error Handling
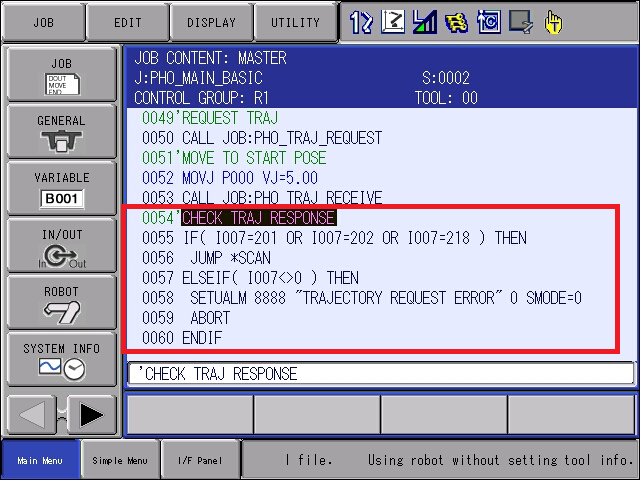
If an error occurs during a request, the error value is stored in the variable I007 PHO_ERROR_DATA (0 = success). All PHO_MAIN templates show basic error handling after PHO_WAIT_FOR_SCAN and PHO_GET_POSES. You can add more specific error handling if you need it. Error codes lists the error codes with their descriptions and troubleshooting.
Example of error handling in INFORM after the PHO_GET_POSES request:
Communication errors - if sending or receiving fails, the module closes the connection and sets I007 to 3 (communication failure) or 4 (bad data). It also sets B003 so that the waiting job continues, and clears B001 PHO_CONNECTED. The examples check B001 after each request and jump back to PHO_CONNECT_TO_VC.
4.1 Error Codes
Error codes defined in the module (PhoClient.h). I007 can also hold any other code sent by the vision controller.
Name |
I007 value |
|---|---|
PHO_REQ_OK |
0 |
SERVICE_ERR |
1 |
UNKNOW_REQ |
2 |
PHO_COMMUNICATION_FAILURE |
3 |
PHO_BAD_DATA |
4 |
PHO_INVALID_SOLUTION_ID |
450 |
PHO_ANOTHER_SOLUTION_RUNNING |
451 |
PHO_SOLUTION_START_ERROR |
452 |
PHO_SOLUTION_NOT_RUNNING |
453 |
PHO_SOLUTION_STOP_ERROR |
454 |
PHO_SOLUTION_INCOMPLETE |
455 |
PHO_INVALID_BRAND_ID |
457 |
PHO_SOL_ALREADY_RUNNING |
458 |
PHO_SOLUTION_FORBID |
459 |
PHO_INVALID_VS |
460 |
PHO_CALIBRATION_ALREADY_RUNNING |
461 |
PHO_CALIBRATION_NOT_RUNNING |
462 |
PHO_CALIBRATION_STOP_ERROR |
463 |
PHO_CALIBRATION_START_ERROR |
464 |
PHO_CALIBRATION_DISABLED |
465 |
PHO_CALIBRATION_NOT_ENOUGH_POINTS |
466 |
PHO_NOT_ENOUGH_ACCURACY (calibration accuracy above the allowed threshold) |
467 |
PHO_SCANNER_NOT_AVAILABLE |
468 |
PHO_CALIB_FORBID |
469 |
PHO_VS_NOT_FOUND |
500 |
PHO_EMPTY_SCENE |
501 |
PHO_NO_OBJ_RUN (no object found, localization still running) |
502 |
PHO_NO_OBJ_STOP (no object found, localization stopped) |
503 |
PHO_REJECT_RUN (all objects rejected, localization still running) |
504 |
PHO_REJECT_STOP (all objects rejected, localization stopped) |
505 |
4.2 Controller Alarms
The MotoPlus module raises these user alarms on the controller:
Alarm |
Meaning |
|---|---|
8000 |
Unknown request ID in I004 |
8001 |
Incorrect vision controller IP address in I000-I003 |
8002 |
Cannot create a socket |
8003 |
Cannot connect to the vision controller (port 11003) |
8004 |
Cannot send the brand ID to the vision controller |
8011 |
The response does not belong to the sent request (request ID mismatch) |
8013 / 8015 |
Unexpected or unknown operation type in the response |
8014 |
Cannot receive or store the object pose or calibration pose |
8016 |
The operation does not match the request |
8021 |
Cannot read or write a variable (B, I or P) |
8024 |
Cannot read a flag while waiting |
8035 |
Cannot read the TCP position (for example, User Coordinate 1 is not defined) |
5. Info Data
Info data are extra values that the vision controller sends with a response (see Info data). The module writes each value into an integer variable. Keys 1-3 are used only by Bin Picking Studio (BPS), so I021-I023 stay reserved.
Info data key |
Variable |
Unit in robot |
|---|---|---|
4 Dimension X |
I024 |
mm |
5 Dimension Y |
I025 |
mm |
6 Rotation Z |
I026 |
whole degrees (converted from mrad) |
7 Neural network label |
I027 |
integer |
8 Max Z height |
I028 |
mm |
9 Tilt |
I029 |
mrad |
10 Calibration accuracy |
I015 |
µm |
11 Running solution ID |
I034 |
integer |
12 Number of localized objects |
I016 |
integer |
13 Number of ready objects |
I017 |
integer |
14 Processing state |
I018 |
0 / 1 |
Keys 4-9 come with PHO_GET_POSES. Key 10 comes with PHO_CALIB_ADD_POINT and PHO_CALIB_SAVE, key 11 with PHO_GET_RUNNING_SOLUTION, and keys 12-14 with PHO_GET_STATUS. When several poses are received, I024-I029 hold the values of the last received object.
6. Version and Brand ID
Item |
Value |
|---|---|
Robot module version |
1.5.0 |
Brand ID sent to the vision controller |
|
Action Request port (the robot connects to the vision controller) |
11003 |
Robot State Server port |
none (the LS module has no Robot State Server) |
7. Migration
See Migration from LS 1.4.x to LS 1.5.x for the changes between Robot module versions. In short: Info data are no longer written to string variables. They go to the integer variables listed in chapter 5, and the running solution ID moved to I034.